Azure DevOps and Automation

Agenda
Intro to Azure DevOps
- What is Azure DevOps?
- Core Services Overview
- Repos, Boards & Pipelines
Pipeline Fundamentals
- Azure Pipelines
- Pipeline Structure
- Stages, Jobs & Steps
- Tasks & Scripts
- Triggers
- Variables & Expressions
Advanced Topics
- Agents & Agent Pools
- Service Connections & Artifacts
- Environments & Approvals
- Templates
- Best Practices
Introduction to Azure DevOps
Azure DevOps


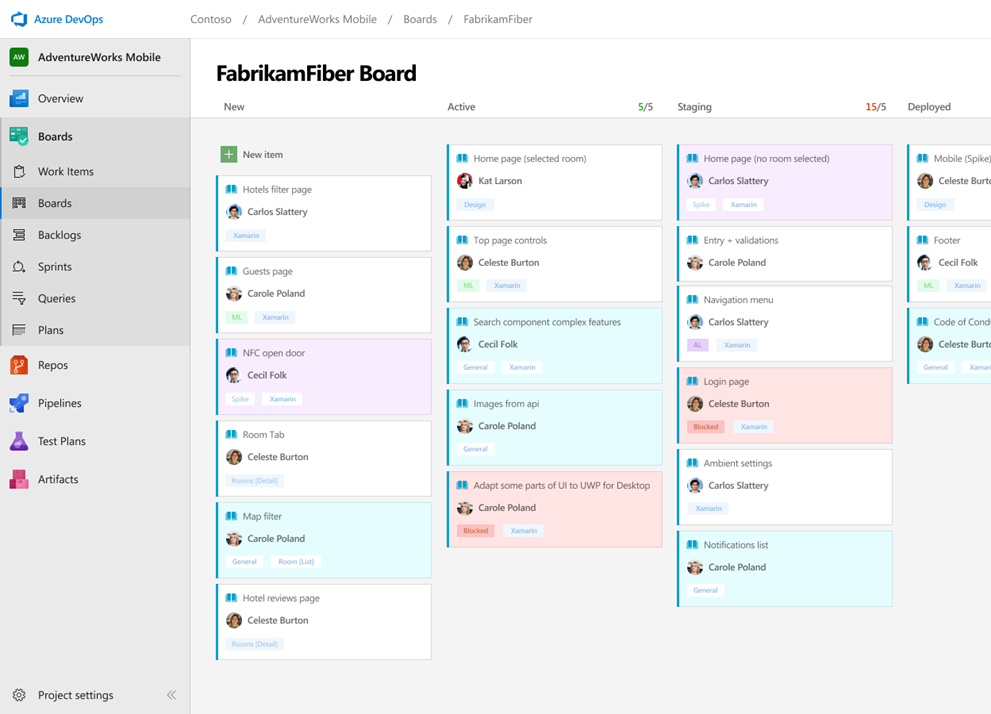
Azure Boards
Track work with Kanban boards, backlogs, team dashboards, and custom reporting
Connected from idea to release
Track ideas at every stage with code changes linked to work items
Scrum ready
Built-in scrum boards and planning tools for sprints, stand-ups, and planning
Project insights
Analytics tools and dashboard widgets for project health and status
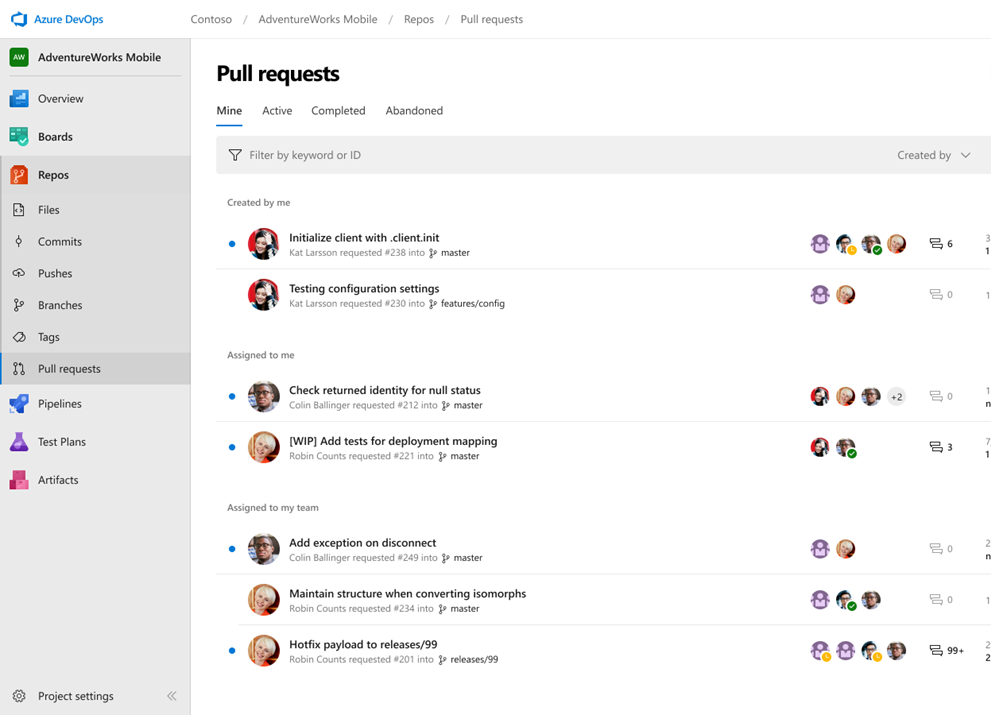
Azure Repos
Unlimited private Git repo hosting and TFVC support from hobby projects to the world's largest repositories
Works with your Git client
Securely connect and push code from any IDE, editor, or Git client
Web hooks and API integration
Add validations and extensions from the marketplace or build your own using web hooks and REST APIs
Semantic code search
Quickly find what you're looking for with code-aware search that understands classes and variables
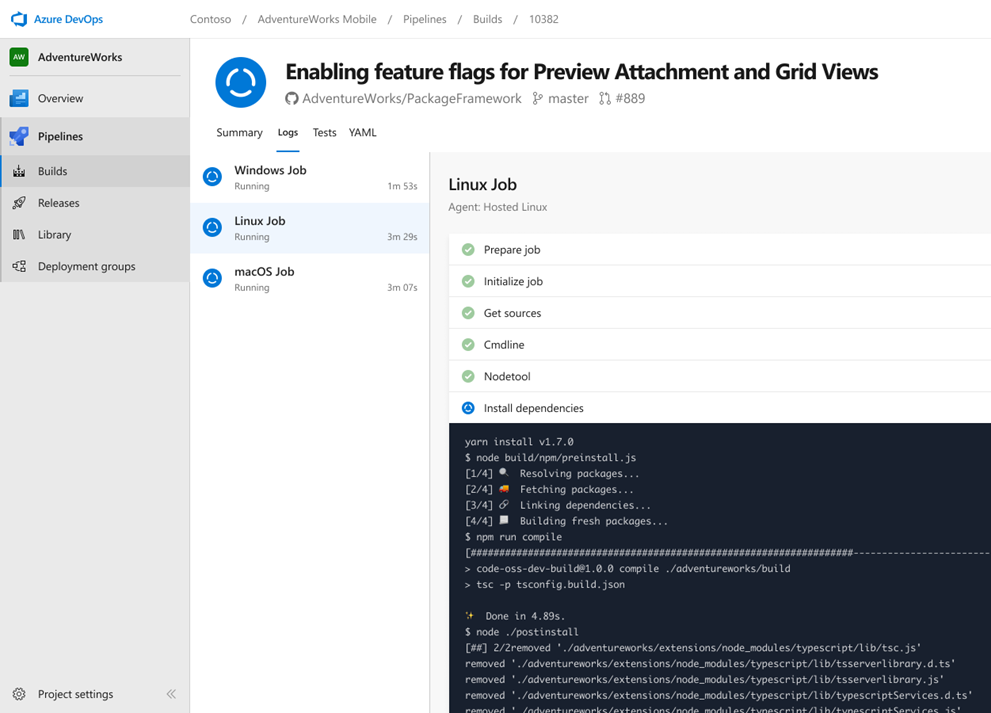
Azure Pipelines
Cloud-hosted pipelines for Linux, Windows and macOS, with unlimited minutes for open source
Any language, any platform, any cloud
Build, test, and deploy Node.js, Python, Java, .NET, and more across Linux, macOS, and Windows
Extensible
Community-built build, test, and deployment tasks plus hundreds of extensions from Slack to SonarCloud
Containers and Kubernetes
Build and push images to container registries, deploy to individual hosts or Kubernetes
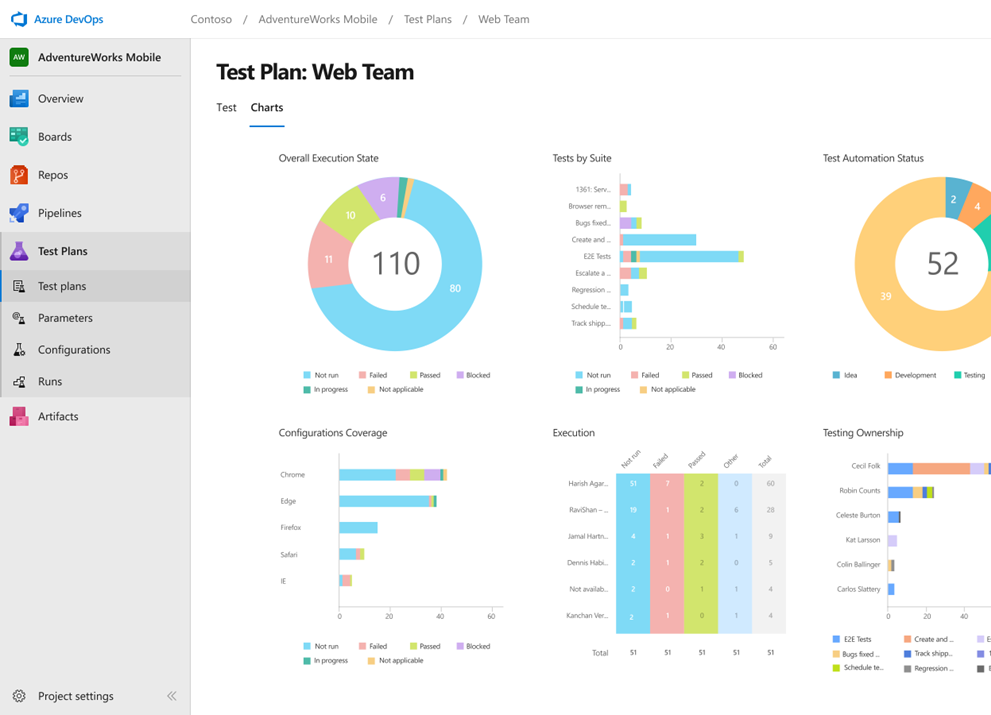
Azure Test Plans
End-to-end traceability. Run tests, log defects, and track quality throughout your testing lifecycle
Capture rich data
Capture scenario data as you test to make defects actionable. Create test cases from exploratory sessions
Test across web and desktop
Complete scripted tests across desktop or web scenarios, on-premises or in the cloud
End-to-end traceability
Leverage the same test tools across engineers and user acceptance testing stakeholders
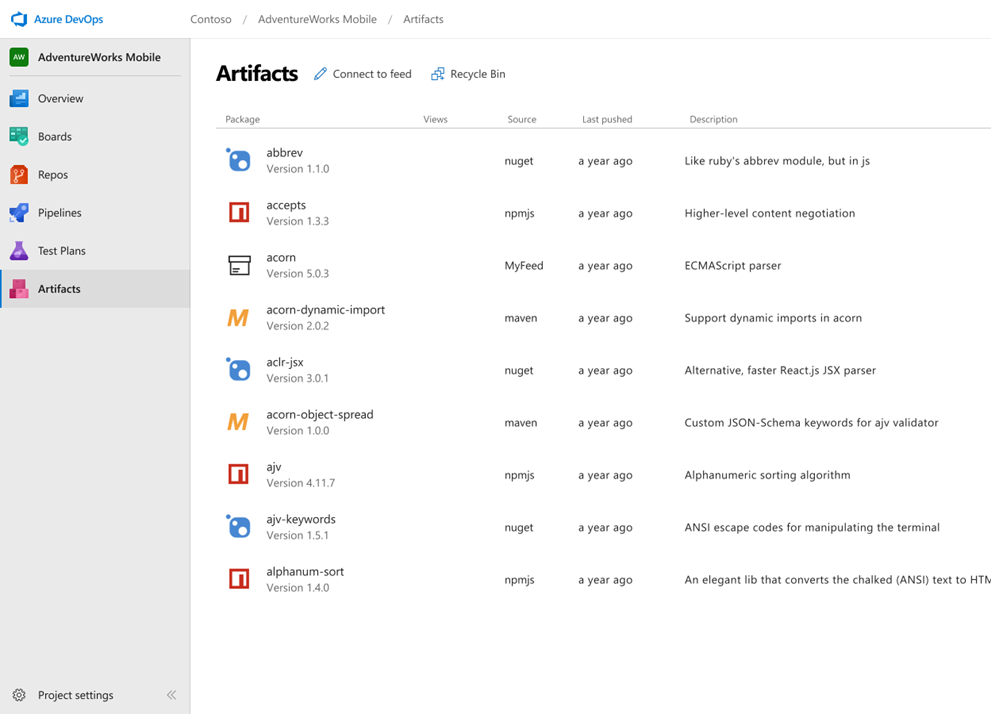
Azure Artifacts
Create and share Maven, npm, and NuGet package feeds — fully integrated into CI/CD pipelines
Manage all package types
Universal artifact management for Maven, npm, and NuGet from public and private sources
Add packages to any pipeline
Share packages with built-in CI/CD, versioning, and testing
Share code efficiently
Easily share code across small teams and large enterprises
Azure Pipelines
What are Azure Pipelines?
- Cloud-hosted CI/CD service in Azure DevOps
- Automates build, test, and deployment
- Works with any language, platform, or cloud
- Pipelines defined as code in YAML
- Version-controlled alongside your source
CI vs CD Pipelines
Continuous Integration (CI)
- Triggered on every code change
- Compiles & builds the application
- Runs automated tests
- Produces a versioned artifact
- For IaC projects: validates & lints templates even without a traditional build
Continuous Delivery (CD)
- Triggered after a successful CI build
- Deploys artifacts to target environments
- Promotes through stages (e.g. Dev → QA → Prod)
- May include approval gates
Why YAML over Classic?
YAML Pipelines
- Version-controlled
- Code review via PRs
- Branching & merging
- Templates & reuse
Classic Pipelines
- GUI-based editor
- No version control
- Limited reusability
- Being deprecated
Pipeline Structure
Pipeline Structure

Pipeline Structure
The simplest possible pipeline
trigger:
  - main

pool:
  vmImage: 'ubuntu-latest'

steps:
  - script: echo Hello, world!
    displayName: 'Run a one-line script'
Full Pipeline Hierarchy
trigger:
  - main

stages:
  - stage: Build
    jobs:
      - job: BuildApp
        pool:
          vmImage: 'ubuntu-latest'
        steps:
          - task: DotNetCoreCLI@2
            inputs:
              command: 'build'

  - stage: Deploy
    dependsOn: Build
    jobs:
      - job: DeployApp
        steps:
          - script: echo Deploying...
Stages, Jobs & Steps
Stages
- Logical division of a pipeline (Build, Test, Deploy)
- Run sequentially by default
- Can define dependencies with
dependsOn - Each stage can target different environments
stages:
  - stage: Build
    displayName: 'Build Stage'
  - stage: Test
    dependsOn: Build
  - stage: Deploy
    dependsOn: Test
Jobs
- A unit of work that runs on one agent
- Jobs within a stage run in parallel by default
- Use
dependsOnto control ordering - Each job gets a fresh agent workspace
jobs:
  - job: UnitTests
    pool:
      vmImage: 'ubuntu-latest'
    steps:
      - script: dotnet test

  - job: IntegrationTests
    dependsOn: UnitTests
    steps:
      - script: dotnet test --filter Category=Integration
Steps
- The smallest unit of execution
- Run sequentially within a job
- Three types:
script,task,checkout - Each step runs in its own process on the agent
steps:
  - checkout: self          # Check out source code
  - script: npm install     # Run a script
  - task: PublishBuildArtifacts@1  # Run a task
    inputs:
      pathToPublish: '$(Build.ArtifactStagingDirectory)'
Tasks & Scripts
Tasks
- Pre-packaged, versioned automation units
- Hundreds available in the Marketplace
- Referenced as
TaskName@Version - Inputs configured via the
inputsproperty
steps:
  - task: UseDotNet@2
    inputs:
      packageType: 'sdk'
      version: '8.x'

  - task: DotNetCoreCLI@2
    inputs:
      command: 'build'
      projects: '**/*.csproj'
Script Steps
Three ways to run inline scripts
steps:
  # Cross-platform (runs cmd on Windows, bash on Linux/Mac)
  - script: echo Hello from script
    displayName: 'Cross-platform script'

  # Bash specifically
  - bash: |
      echo "Running on $(Agent.OS)"
      ./run-tests.sh
    displayName: 'Bash script'

  # PowerShell specifically
  - powershell: |
      Write-Host "Building project..."
      dotnet build -c Release
      dotnet build -c Release
    displayName: 'PowerShell script'
Triggers
CI Triggers
Automatically run on code changes
# Simple — trigger on specific branches
trigger:
  - main
  - release/*

# Detailed — include/exclude branches and paths
trigger:
  branches:
    include:
      - main
      - feature/*
    exclude:
      - feature/experimental
  paths:
    include:
      - src/**
    exclude:
      - docs/**
PR Triggers
Run validation on pull requests
pr:
  branches:
    include:
      - main
      - release/*
  paths:
    include:
      - src/**
    exclude:
      - '*.md'
Scheduled Triggers
Run pipelines on a schedule using cron syntax
schedules:
  - cron: '0 2 * * Mon-Fri'
    displayName: 'Weekday 2am build'
    branches:
      include:
        - main
    always: true    # Run even if no changes

  - cron: '0 8 * * Sun'
    displayName: 'Weekly full test'
    branches:
      include:
        - main
    always: false   # Only if changes exist
Variables & Expressions
Variables
Storing and using values in your pipeline
# Inline variables
variables:
  buildConfiguration: 'Release'
  dotnetVersion: '8.x'

steps:
  - script: dotnet build -c $(buildConfiguration)
  - task: UseDotNet@2
    inputs:
      version: $(dotnetVersion)
Variable Scoping
Variables can be scoped at multiple levels
variables:          # Pipeline-level
  globalVar: 'shared'

stages:
  - stage: Build
    variables:      # Stage-level
      stageVar: 'build-only'
    jobs:
      - job: Compile
        variables:  # Job-level
          jobVar: 'compile-only'
        steps:
          - script: |
              echo $(globalVar)   # Works
              echo $(stageVar)    # Works
              echo $(jobVar)      # Works
Variable Groups & Secrets
- Variable groups store values in the Azure DevOps UI
- Link to Azure Key Vault for secrets
- Secrets are masked in logs automatically
- Referenced with the
groupkeyword
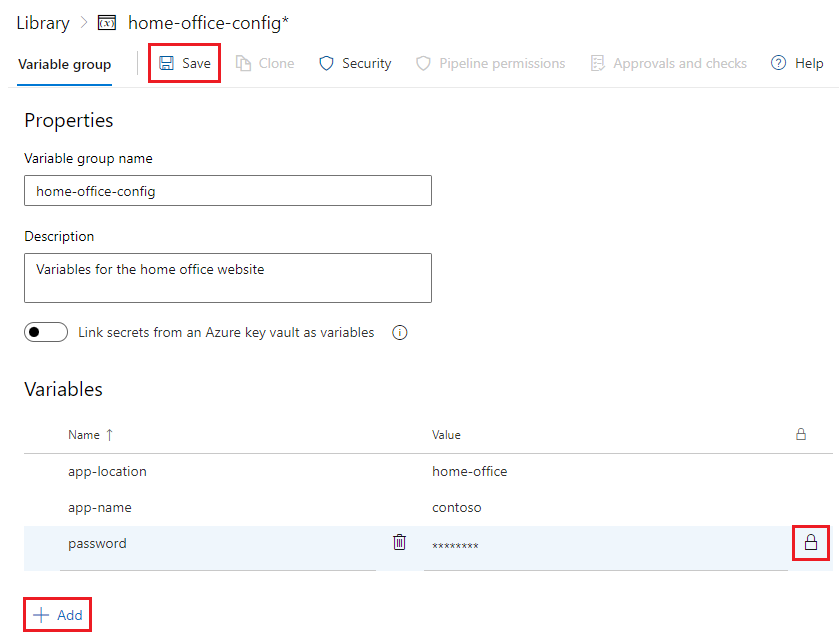
variables:
- group: home-office-config # name of variable group defined in Azure DevOps

steps:
- script: echo $(app-name) # references variable 'myhello' from the variable group
Predefined Variables
- Azure DevOps automatically sets dozens of variables on every run
- Provide context about the build, repo, agent, and environment
- Referenced with
$(Variable.Name)syntax - Available in YAML values, scripts, and task inputs
- Grouped by prefix: Build.*, System.*, Agent.*, Pipeline.*
Predefined Variables — Build & System
| Variable | Description | Example Value |
|---|---|---|
Build.SourceBranch | Full ref of the triggering branch | refs/heads/main |
Build.SourceBranchName | Short branch name | main |
Build.BuildId | Unique numeric ID for this run | 4827 |
Build.BuildNumber | Formatted run name | 20260217.3 |
Build.Repository.Name | Name of the source repository | my-app |
Build.SourceVersion | Commit SHA that triggered the run | a1b2c3d... |
Build.Reason | Why the build ran | IndividualCI |
System.TeamProject | Name of the Azure DevOps project | MyProject |
Predefined Variables — Paths & Agent
| Variable | Description |
|---|---|
Build.ArtifactStagingDirectory | Local path for staging artifacts before publishing |
Build.SourcesDirectory | Local path where source code is checked out |
System.DefaultWorkingDirectory | Default working directory (same as sources dir) |
Pipeline.Workspace | Root workspace directory for the pipeline |
Agent.OS | Operating system of the agent |
Agent.MachineName | Name of the agent machine |
Agent.TempDirectory | Temp folder, cleaned after each job |
Agent.ToolsDirectory | Cached tools directory (e.g., .NET, Node) |
Conditions & Expressions
Control when stages, jobs, or steps run
steps:
  - script: echo 'Running on main branch'
    condition: eq(variables['Build.SourceBranch'],
                  'refs/heads/main')

  - script: echo 'Previous step failed'
    condition: failed()

stages:
  - stage: DeployProd
    condition: and(succeeded(),
      eq(variables['Build.SourceBranch'],
         'refs/heads/main'))
Agents & Agent Pools
What is an Agent?
- A compute environment that executes your pipeline jobs
- Pipelines define what to do — agents do the actual work
- Each job runs on exactly one agent
- Without an agent, your pipeline has no machine to run on
- Agents are organised into agent pools for management
Agent Pools
- A logical grouping of agents with shared permissions and capabilities
- Pipelines specify a pool, not an individual agent
- Azure DevOps assigns the next available agent from the pool
- Manage capacity by adding or removing agents from a pool
- Set permissions and pipeline access at the pool level
Microsoft-hosted vs Self-hosted Agents
Microsoft-hosted
- Fresh VM per job
- Maintenance-free
- Pre-installed tools
- Limited customization
- 1 free parallel job (60 min/month)
- Purchase additional parallel jobs
Self-hosted
- You manage the machine
- Persistent between runs
- Full control over tools
- Can access private networks
- 1 free parallel job (unlimited minutes)
- You provide the infrastructure
Agents & Agent Pools
Azure DevOps
Microsoft-hosted Pool
Self-hosted Pool
Jobs are assigned to available agents from the specified pool
Specifying Agent Pools
# Microsoft-hosted — by VM image name
pool:
  vmImage: 'ubuntu-latest'    # or windows-latest, macos-latest

# Self-hosted — by pool name
pool:
  name: 'MySelfHostedPool'
  demands:
    - npm
    - Agent.OS -equals Linux

# Per-job pool selection
jobs:
  - job: LinuxBuild
    pool:
      vmImage: 'ubuntu-latest'
  - job: WindowsBuild
    pool:
      vmImage: 'windows-latest'
Environments & Approvals
Environments
- Named targets for deployment (Dev, Staging, Prod)
- Track deployment history and status, with links to work items
- Attach approvals and checks
- Used with
deploymentjobs - Not generally tied to actual infrastructure — a logical concept only
jobs:
  - deployment: DeployWeb
    environment: 'Production'
    strategy:
      runOnce:
        deploy:
          steps:
            - script: echo Deploying to production
Approvals & Checks
runs
starts
evaluate
→ Deploy
- Approvals and checks are defined on environments, not directly in YAML pipelines. Stages in the pipeline are then associated with environments.
- Manual approvals, business hours, branch control
- Pipeline pauses until all checks pass
Approvals & Checks — Full List
Checks run in category order — static first, then approvals, then dynamic
| Category | Check | Purpose |
|---|---|---|
| Static | Branch Control | Restrict which branches can deploy |
| Required Template | Enforce use of approved YAML templates | |
| Evaluate Artifact | Validate container images against policies | |
| Dynamic | Manual Approval | Designated approvers must sign off |
| Business Hours | Only deploy within a time window | |
| Invoke Azure Function | Serverless custom validation logic | |
| Invoke REST API | Call any external service for validation | |
| Query Azure Monitor | Verify no alerts after deployment | |
| Lock | Exclusive Lock | Only one pipeline stage at a time |
| Extension | ServiceNow Change Mgmt | Integrate ServiceNow change requests |
Templates
Templates — Reusing Pipelines
- DRY principle for pipelines
- Define reusable steps, jobs, or stages
- Accept parameters for customization
- Share across repos via
resources - Enforce governance with
extends
Step Template
Template File
# templates/build-steps.yml
parameters:
  - name: configuration
    default: 'Release'

steps:
  - task: UseDotNet@2
    inputs:
      version: '8.x'
  - script: |
      dotnet build \
        -c ${{ parameters.configuration }}
Main Pipeline
# azure-pipelines.yml
steps:
  - template: templates/build-steps.yml
    parameters:
      configuration: 'Debug'
Job & Stage Templates
# templates/deploy-stage.yml
parameters:
  - name: environment
    type: string
  - name: vmImage
    default: 'ubuntu-latest'

stages:
  - stage: Deploy_${{ parameters.environment }}
    jobs:
      - deployment: Deploy
        environment: ${{ parameters.environment }}
        pool:
          vmImage: ${{ parameters.vmImage }}
        strategy:
          runOnce:
            deploy:
              steps:
                - script: echo Deploying to ${{ parameters.environment }}
Using Stage Templates
# azure-pipelines.yml
trigger:
  - main

stages:
  - stage: Build
    jobs:
      - job: BuildApp
        steps:
          - script: dotnet build

  - template: templates/deploy-stage.yml
    parameters:
      environment: 'Staging'

  - template: templates/deploy-stage.yml
    parameters:
      environment: 'Production'
Extends vs Include Templates
Two fundamentally different approaches
Include (template:)
- Inserts steps/jobs/stages into your pipeline
- Pipeline author has full control
- Can add anything before or after
- Great for reuse
Extends (extends:)
- Your pipeline runs inside the template
- Template author has control
- Pipeline author fills in the gaps
- Great for governance
Extends Template — How It Works
Template (owned by platform team)
# templates/secure-pipeline.yml
parameters:
  - name: buildSteps
    type: stepList
    default: []

stages:
  - stage: Build
    jobs:
      - job: Build
        steps:
          - task: CredScan@3
          - ${{ each step in parameters.buildSteps }}:
            - ${{ step }}
          - task: PublishSecurityAnalysis@0
Pipeline (owned by dev team)
# azure-pipelines.yml
trigger:
  - main

extends:
  template: templates/secure-pipeline.yml
  parameters:
    buildSteps:
      - script: dotnet build
      - script: dotnet test
Enforcing Extends with Checks
- Use the Required Template check on environments
- Pipeline must extend an approved template to deploy
- Prevents teams from bypassing governance
- Combine with branch control for full protection
Environment: Production
Check: Pipeline must extend templates/secure-pipeline.yml from MyProject/pipeline-templates
Cross-Repo Templates
Share templates across repositories
resources:
  repositories:
    - repository: templates
      type: git
      name: MyProject/pipeline-templates
      ref: refs/tags/v1.0

stages:
  - template: stages/build.yml@templates
    parameters:
      solution: '**/*.sln'

  - template: stages/deploy.yml@templates
    parameters:
      environment: 'Production'
Service Connections & Artifacts
Service Connections
- Secure links to external services
- Azure, Docker, Kubernetes, npm, NuGet, etc.
- Managed in Project Settings
- Credentials stored securely — never in YAML
steps:
  - task: AzureWebApp@1
    inputs:
      azureSubscription: 'my-azure-connection'
      appName: 'my-web-app'
      package: '$(Build.ArtifactStagingDirectory)/**/*.zip'
Pipeline Artifacts
Pass files between jobs and stages
# Publish artifacts in the Build stage
- task: PublishPipelineArtifact@1
  inputs:
    targetPath: '$(Build.ArtifactStagingDirectory)'
    artifact: 'drop'

# Download artifacts in the Deploy stage
- task: DownloadPipelineArtifact@2
  inputs:
    artifact: 'drop'
    path: '$(Pipeline.Workspace)/drop'
Putting It All Together
A complete CI/CD pipeline
trigger:
  branches:
    include: [ main ]

variables:
  buildConfiguration: 'Release'

stages:
  - stage: Build
    jobs:
      - job: BuildAndTest
        pool: { vmImage: 'ubuntu-latest' }
        steps:
          - task: UseDotNet@2
            inputs: { version: '8.x' }
          - script: dotnet build -c $(buildConfiguration)
          - script: dotnet test --no-build
          - task: PublishPipelineArtifact@1
            inputs:
              targetPath: '$(Build.ArtifactStagingDirectory)'
              artifact: 'drop'

  - stage: DeployStaging
    dependsOn: Build
    jobs:
      - deployment: Deploy
        environment: 'Staging'
        strategy:
          runOnce:
            deploy:
              steps:
                - task: AzureWebApp@1
                  inputs:
                    azureSubscription: 'azure-conn'
                    appName: 'myapp-staging'

  - stage: DeployProd
    dependsOn: DeployStaging
    condition: eq(variables['Build.SourceBranch'], 'refs/heads/main')
    jobs:
      - deployment: Deploy
        environment: 'Production'
        strategy:
          runOnce:
            deploy:
              steps:
                - task: AzureWebApp@1
                  inputs:
                    azureSubscription: 'azure-conn'
                    appName: 'myapp-prod'
Best Practices
Best Practices
- Use templates to avoid duplication
- Pin task versions —
Task@2notTask - Store secrets in Variable Groups or Key Vault
- Use path triggers to avoid unnecessary runs
- Add meaningful
displayNameto all steps
More Best Practices
- Use
extendstemplates for governance - Keep pipelines small — compose with templates
- Use environments with approvals for production
- Test pipeline changes in feature branches
- Document non-obvious pipeline logic in comments
Key Takeaways
Resources
Hands-On Lab
Build a CI/CD pipeline with Azure DevOps & Bicep
Objectives
- Create and run an Azure DevOps YAML pipeline
- Connect a pipeline to Azure using a service connection
- Validate a Bicep file as a CI step
- Deploy infrastructure to Azure (CD)
- Configure environments and approval gates
Prerequisites
- Access to an Azure DevOps organization & project
- The infra/main.bicep file uploaded to your repo
- A service connection to your Azure subscription
Questions?
Thank you for attending